准备工作 网盘有工具合集https://www.123684.com/s/JVHLVv-rVWeh提取码:zlay
安装nodejs 本次教程基于hexo7.3.0最少要安装nodejs18
下载地址:https://nodejs.org/download/release/latest-v18.x/node-v18.20.8-x64.msi
安装git命令行工具 下载地址:https://git-scm.com/downloads
设置npm镜像源 1 2 3 4 5 6 7 8 在任意文件夹->右键->open git base here 之后再窗口输入命令 设置为淘宝源 npm config set registry https://registry.npmmirror.com/ 查看npm源 npm config get registry 查看nodejs版本 node -v
安装notepad++编辑器 可选 好用的编辑器
安装Typora 用于写博客
从网盘下载集成版,或者从官网下载
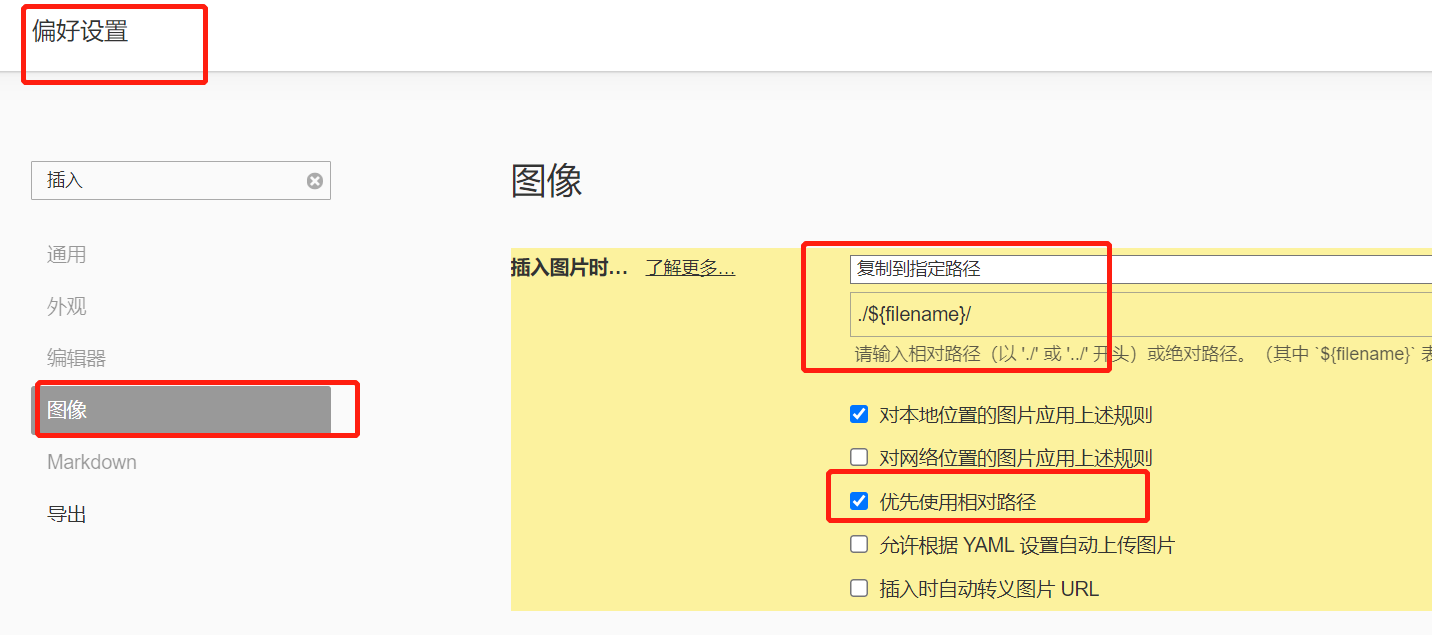
需修改如下设置,依赖hexo配置和插件 hexo-asset-image有bug 使用替代插件hexo-asset-pro
注册github账号 地址https://github.com/ 记下用户名 密码 邮箱
可能需要特殊上网方式推荐几个自己测试使用,有推荐请留言
https://github.com/docmirror/dev-sidecar
https://github.com/521xueweihan/GitHub520
新建3个仓库 第一个仓库的名必须是.github.io 公开的仓库 存放最终生成的站点
username是你的用户名
第二个仓库hexo 源码仓库 存放你的hexo网站源码 私有!!!
第三个如果使用utterances作为评论系统则需要建一个评论仓库存放留言 公开仓库 名字随意,
之后在https://github.com/apps/utterances配置下这个仓库
安装GithubDesktop 或者安装其他git客户端工具
登录并且设置为github的用户名和邮箱, 如图
设置ssh秘钥 从零新建hexo 官方文档 https://hexo.io/zh-cn/docs/
安装hexo 1 2 3 4 5 6 7 全局安装 npm install -g hexo-cli 执行hexo命令 npx有时候可以省略 不好使就加上npx npx hexo <command> 查看版本 hexo -v
新建hexo 1 2 3 4 5 6 7 8 9 10 11 12 在你想存放代码的文件夹右键->git base here hexo init <folder> 执行这个命令好像需要特殊上网要不容易失败 cd <folder> hexo g hexo s 之后就可以在浏览器打开http://127.0.0.1:4000/访问刚刚生成的项目 如果要关闭服务器按Ctrl+C hexo常用命令 hexo clean --清理 hexo g --清理 生成网页 hexo s --本地启动服务器http://127.0.0.1:4000/
下载next主题 官网https://theme-next.js.org/
下载https://github.com/next-theme/hexo-theme-next/releases
下载之后解压放在themes文件夹下 改文件夹名为next
安装插件 1 2 3 4 5 6 7 8 9 10 11 cd到hexo项目文件夹下 npm install hexo-asset-pro --save npm install hexo-deployer-git --save npm install hexo-generator-feed --save npm install hexo-generator-searchdb --save npm install hexo-generator-sitemap --save #代码压缩插件 https://github.com/curbengh/hexo-yam npm install hexo-yam --save #拼音插件 npm install hexo-permalink-pinyin --save
配置_config.yml(根目录下) 大部分使用默认配置不用改,以下列出需要更改 的配置项
1 2 3 4 5 6 7 8 9 10 11 12 13 14 15 16 17 18 19 20 21 22 23 24 25 26 27 28 29 30 31 32 33 34 35 36 37 38 39 40 41 42 43 44 45 46 47 48 49 50 51 52 53 54 55 56 57 58 59 60 61 62 63 64 65 66 67 68 69 70 71 72 73 74 75 76 77 78 79 80 81 82 83 84 85 86 87 88 89 90 91 title: 主标题XXX’Blog subtitle: 副标题 description: 描述,或者个人介绍 keywords: 关键字 可以不写 author: 个人昵称 显示在网站下方 language: zh-CN timezone: Asia/Shanghai url: https://XXX.github.io/ root: / permalink: /p/:year-:month-:day-:title/ new_post_name: :year-:month-:day-:title.md 建议使用这个格式 post_asset_folder: true theme: next deploy: - type: git repo: git@gitee.com:XXX/XXX.git branch: master - type: git repo: git@github.com:XXX/XXX.github.io.git branch: main search: path: search.xml field: post content: true format: html minify: enable: true previewServer: true html: enable: true exclude: css: enable: true exclude: - "*.min.css" js: enable: true exclude: - "*.min.js" svg: enable: true include: - "*.svg" - "!*.min.svg" gzip: enable: true include: - "*.html" - "*.css" - "*.js" - "*.txt" - "*.ttf" - "*.atom" - "*.stl" - "*.xml" - "*.svg" - "*.eot" - "*.json" brotli: enable: true include: - "*.html" - "*.css" - "*.js" - "*.txt" - "*.ttf" - "*.atom" - "*.stl" - "*.xml" - "*.svg" - "*.eot" - "*.json" permalink_pinyin: enable: true separator: '-'
配置主题Next(themes\next_config.yml) 大部分使用默认配置不用改,以下列出需要更改 的配置项
1 2 3 4 5 6 7 8 9 10 11 12 13 14 15 16 17 18 19 20 21 22 23 24 25 26 27 28 29 30 31 32 33 34 35 36 37 38 39 40 41 42 43 44 45 46 47 48 49 50 51 52 53 54 55 56 57 58 59 60 61 62 63 64 65 66 67 68 69 70 71 72 scheme: Gemini favicon: small: /uploads/favicon-96x96.png medium: /uploads/favicon-96x96.png apple_touch_icon: /uploads/apple-touch-icon.png safari_pinned_tab: /uploads/favicon.svg creative_commons: license: by-nc-nd size: big sidebar: true post: true language: deed.zh-hans menu: home: / || fa fa-home categories: /categories || fa fa-th archives: /archives || fa fa-archive tags: /tags || fa fa-tags about: /about || fa fa-user avatar: url: /uploads/web-app-manifest-512x512.png social: GitHub: https://github.com/XXX || fab fa-github E-Mail: mailto:XXX@gmail.com || fa fa-envelope RSS: /atom.xml || fa fa-rss Gitee: https://gitee.com/XXX || fa fa-envelope footer: since: 2016 beian: enable: false icp: <a href="http://beian.miit.gov.cn/" style="" target="_blank" >辽ICP备12345号</a> gongan_id: 12345 gongan_num: <span style="display:inline-block;" ><img style="float:left;margin-bottom:-3px;margin-right:1px;" src="/uploads/gwab.png" /></span><span>辽公网安备 12345 号 </span> gongan_icon_url: follow_me: 博客园: https://www.cnblogs.com/XXX/ || fa fa-envelope github_banner: enable: true permalink: https://github.com/XXX utterances: enable: true repo: XXXX/XXX-repository local_search: enable: true vendors: plugins: custom custom_cdn_url: https://cdn.staticfile.org/${cdnjs_name}/${version}/${cdnjs_file}
手动部署 1 2 3 4 5 6 执行如下代码即可 hexo clean hexo g hexo d 如果是git需要特殊上网 直接推送到<username>.github.io
源码上传到github 1 2 3 4 5 6 7 8 9 10 11 12 13 14 15 16 17 18 19 20 21 22 23 项目根目录下新增2个文件 文件名叫 .gitignore 内容为 db.json public .deploy_git node_modules/ .deploy*/ Thumbs.db .DS_Store *.log package-lock.json 第二个文件叫.npmignore 内容为 .DS_Store Thumbs.db db.json *.log node_modules/ public/ .deploy*/
github action 一键部署 部署到Cloudflare Pages https://zhuanlan.zhihu.com/p/1896206344874334028
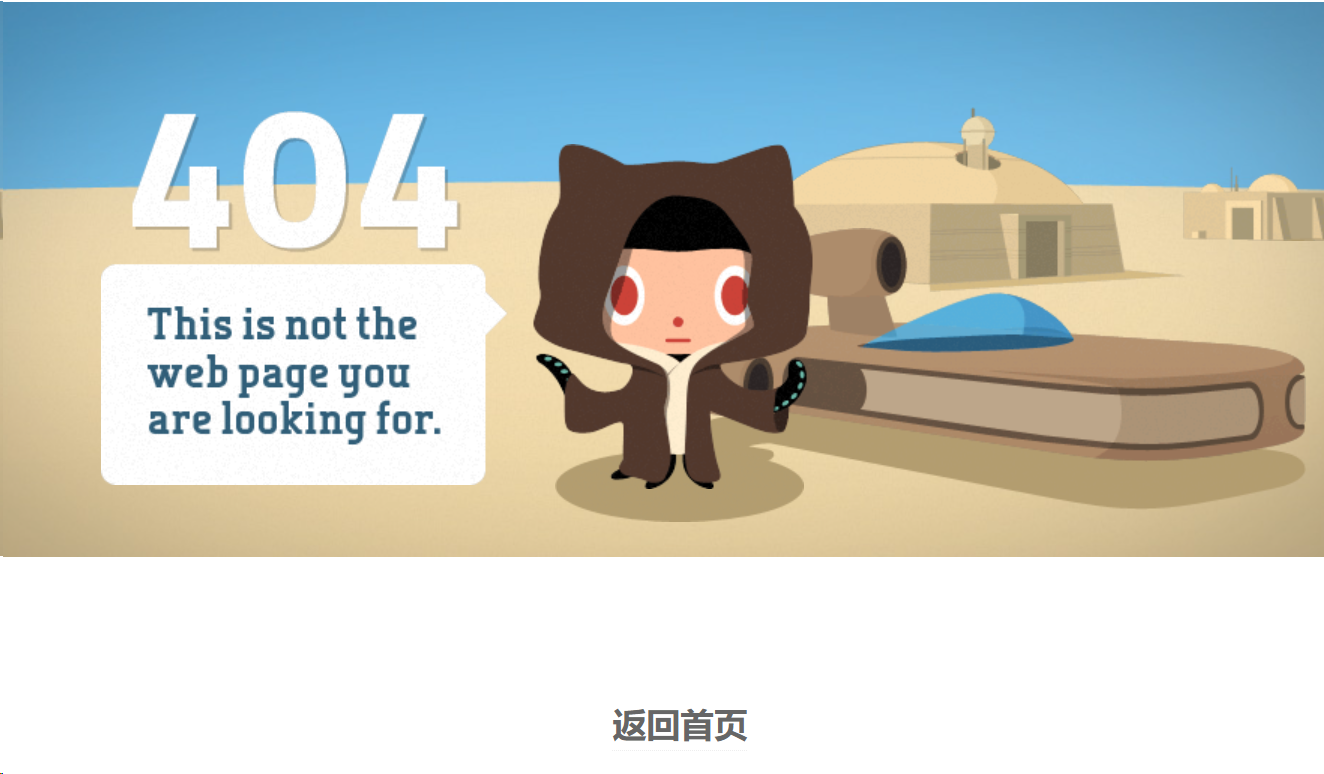
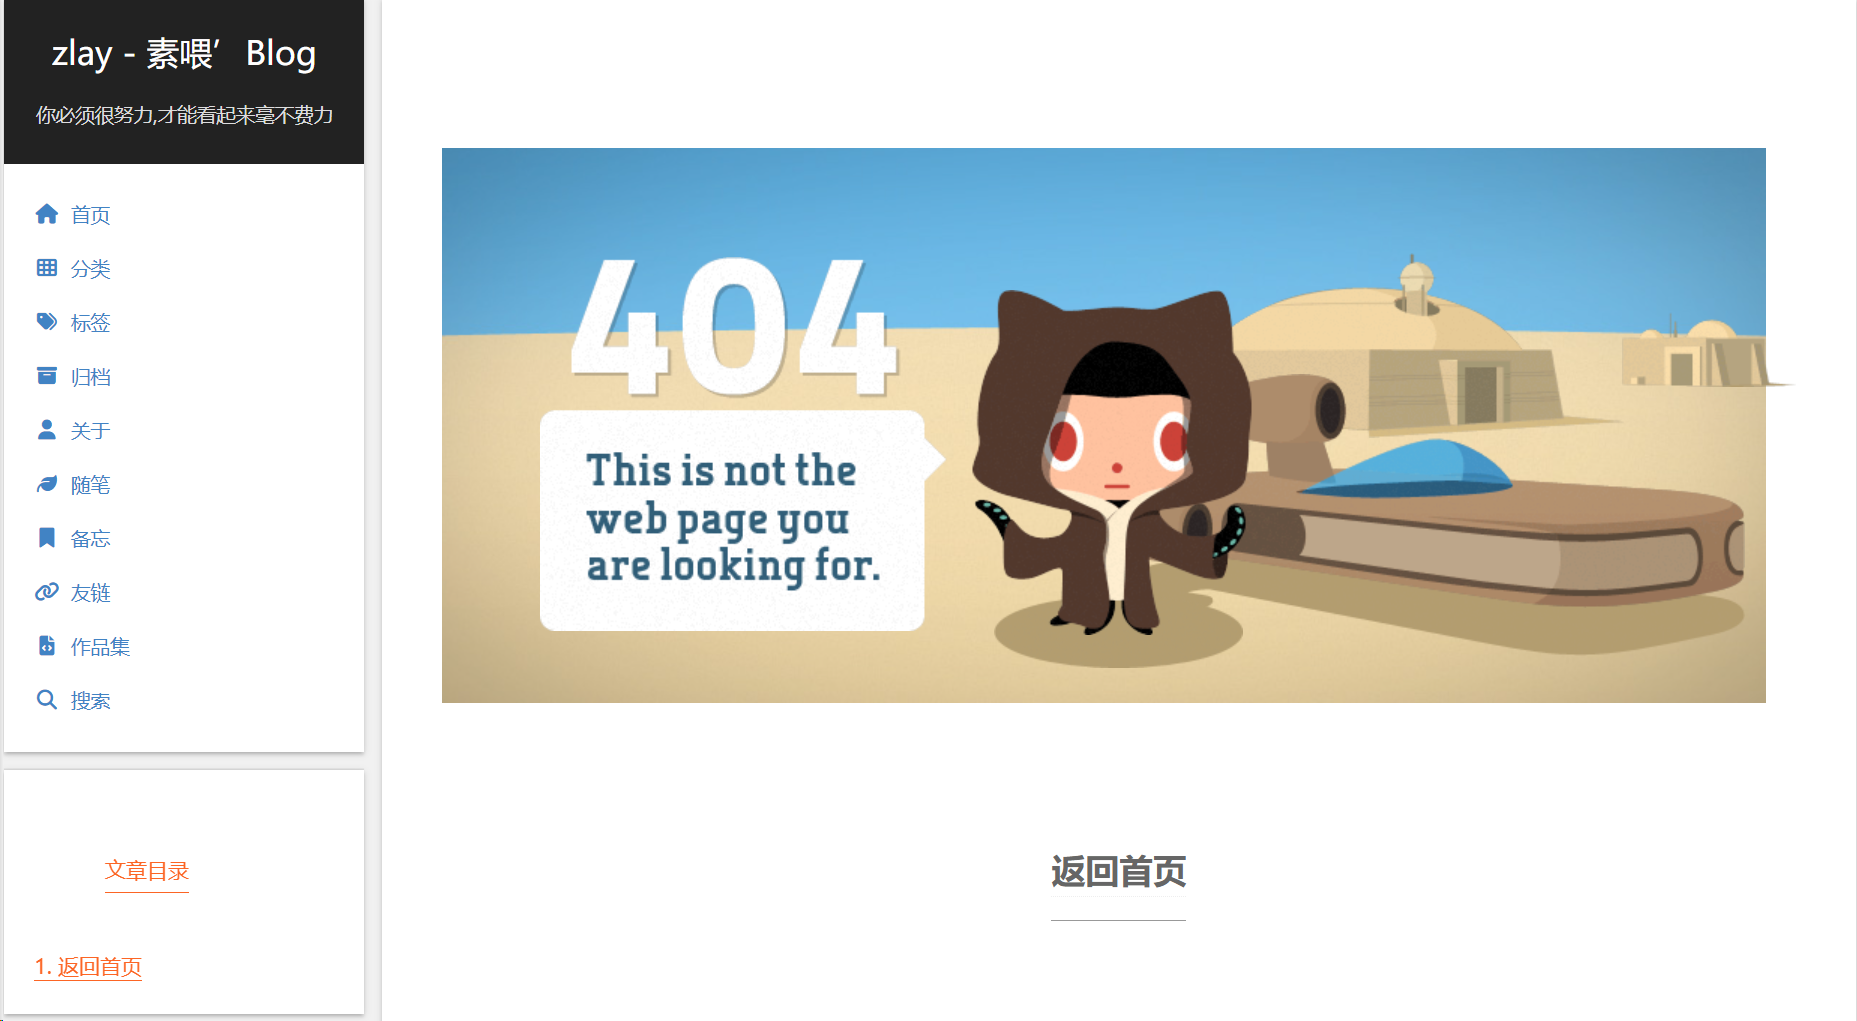
迁移hexo(使用模版构建) 一些技巧 添加404页 在source目录下新增404.html即可 当访问错误的链接的时候会自动显示该页面,在本地执行hexo s 的时候不生效
部署在github会生效
可选项 :可以跳过编译或者参加编译见下方解释
如何跳过编译 skip_render 匹配到的文件将会被不做改动地复制到 public 目录中。 您可使用 glob 表达式来匹配路径。
1 2 3 4 5 6 7 8 9 skip_render: "mypage/**/*" # 将会直接将 `source/mypage/index.html` 和 `source/mypage/code.js` 不做改动地输出到 'public' 目录 # 你也可以用这种方法来跳过对指定文章文件的渲染 skip_render: "_posts/test-post.md" # 这将会忽略对 'test-post.md' 的渲染 ## This also can be used to exclude posts, skip_render: "_posts/test-post.md" # will ignore the `source/_posts/test-post.md`.
举例: 404页面没被编译前 被编译后 更换首页(增加导航) 这里说的首页是 博客列表那个最新的博客在上
1
2
index_generator: path: /home
之后在source目录下新增index.html
给index.html增加到跳过编译的清单中
1
2
3
skip_render: "index.html" 或者 skip_render: "*.html"
https://blog.csdn.net/weixin_44150474/article/details/138997924
存在问题 存在问题 新建文章的时不要用中文文件名 1 2 3 hexo new title #正确 hexo new 新文章 #错误 可以在文件内容里改为中文标题 不影响 只是文件名不要用中文